Apart from that, Unity of Command is about perfect. I used to advise people who were curious about wargames to check out The Ardennes Offensive. It slipped in and out of being freely available, modern OSes began to break it, and it never played well with focus switching, but it wasn't until I found Unity of Command that I had a new wargame gateway drug to push. These days I direct the inquisitive to the Unity of Command demo.
Unity of Command is part of that Panzer General strain of PC games in which gameplay takes place on a hex map and your goal is to control designated victory hexes. The turn-based system ties directly into the victory conditions, creating urgency. Your units are varied in purpose, and while fighting makes them more experienced, it depletes their health and power (which are partly the same variable, called strength) as well. The main purpose of most maps is to put a river right where you wouldn't want one.
There have been a lot of Panzer General sequels and successors and imitators over the years. It was a good game and it deserves its legacy. But I shook my head to see Unity of Command lose an award to Panzer Corps, because Unity of Command is a design triumph and Panzer Corps is a retread. The difference is that unsung developer feat: taking stuff out of the formula. Panzer Corps (judging by the demo, which didn't persuade me I ought to spend two figures for the full game) looks like it's probably okay, but it only adds to the chickenfat trimmings of Panzer General. Units are big knots of details, as complex as Pokemon.
That's not an unreasonable approach. There are smaller-scale games with a lot of detail that I quite like, such as Wargame: AirLand something something and Men of blah. But Unity of Command demonstrates another way, one more suited to the kind of game it is. In Unity of Command, you can see everything there is to know about a unit at a glance, and once you become familiar with the game, the glance doesn't even have to involve looking at its info card. 90% of the time the important thing will be either attack power or speed. You will not be cycling through your air units every turn to make sure they have enough fuel to get back to a landing strip. You will be cycling through your panzer divisions to scatter enemy units trying to pull back to the far side of a river. This game is about big plans, not little routines.
Another example of welcome simplicity is the supply system. Instead of Panzer General's clunky manual per-unit resupply method, Unity of Command calculates the distance of territory you control from your supply network. If a unit is within range of your supply network, it's fine. If it remains isolated from it, it will grow weaker over the next few turns, eventually becoming completely helpless. Returning to the supply network — or expanding the supply network — counters these negative effects on the following turn.
That dance of supply networks is critical to how the game plays. Your attack plan is not just going to be about where the enemy is weakest, or where the terrain makes an attack the most convenient, or where your armored spearhead happens to be. You'll want to concentrate on railroads and bridges, because those are the things that move supplies. Your units can run ahead of the supply trucks for a little while, but not for long. Either they cycle back to friendlier territory, or the supply network catches up to them, or they get a precious supply airdrop (if you even have any available), or they become sitting ducks. It's like playing Pathologic — the immediate danger might be a guy with a knife, but even in the heat of the moment when he rushes you, you're considering the challenges of staying within the gameplay envelope of having enough food and water to survive. It's tough.
Unity of Command is a super challenging game that you will probably win most of the time. In the campaigns, your side is on the attack and has some degree of superiority. The enemy is fighting a delaying action. There's a turn limit beyond which you will automatically lose, but exceeding that limit is rare. For example, you have 24 turns to take Stalingrad. (A turn is supposed to be about four days, a unit is supposed to be about a division, but this game is pretty abstract.) But you have 8 turns to win a Brilliant Victory at Stalingrad, and that's where the challenge comes in. Unity of Command is secretly a score attack game. But like bowling, it's a game where it's possible to get a perfect score. You aren't in pursuit of escalating phantoms on a leaderboard; if you take these objectives by this turn, you have Really Won. It's something fixed and attainable. Which is not to say it's easy.
Chasing that perfect score means never sacrificing score for additional reinforcements. It means that on the first turn you may find yourself designating front-runner units whose job is to sprint flat-out for their objective hexes and never stop until the end of the scenario. It means the most important thing about your best units can be speed, not attack. It means you'll gladly sacrifice elite units to take a bridge immediately instead of next turn. Unity of Command is also secretly a racing game.
But Unity of Command is not a puzzle game. It's not a matter of figuring out the one correct way to win a level, the one the level designers intended. You have assets and a situation to overcome, but your approach is up to you. Even with a scenario as brutal as Stalingrad (and trust me, it's brutal), there are a variety of possible methods. I've dabbled with a central thrust strategy that concentrates the attack along the shortest and best-bridged route. I've tried to come up through the swamps to the south and lock a big chunk of the Soviet army out of the decisive battle. I haven't yet gone all in on a northern strategy with a detour through mostly empty countryside to cut off enemy reinforcements. I remain undecided about the utility of a hasty Volga crossing to stop enemy supplies to the city. (Speaking of rivers, it's nice to see river names on Unity of Command's maps. How many times while playing Hearts of Iron have I asked myself, "Is this the Don or the Meuse? Is Lake Victoria in Switzerland? Help me, I'm so confused!")
Part of the variability is due to the game's simple but wise use of randomness. Too much randomness in a game feels unfun and unfair. Players want good input reflected in good results. Like many games before it, including the original Panzer General, Unity of Command sensibly provides combat predictions before you commit to an attack. Most of the time the outcome is close to the prediction, and because so many of the factors involved can be influenced by the player (what unit do you use, do you provide artillery or air support, what hex are you attacking from, and so on), it doesn't feel uncontrollably random. Air support works a bit similarly -- there's a prediction, but your only choice is which hex to attack, so air support feels more random, especially since using air power against a unit in a city can lead to the "city in ruins" condition which functions as a penalty against attackers.
But the most random aspect of the game is weather, which can cripple attacks -- and more importantly, movement rates -- and destroy your plans. Bad weather also prevents air support. As the attacker, you are almost certain to be more inconvenienced by weather than the defending enemy is. You can make some guesses about likely weather based on the season, but if the weather sucks, it sucks, and you have to work around that. Panzer General had the spinoff Fantasy General, with magic and stuff. Maybe Unity of Command will one day spawn Fantasy of Command and you'll be able to summon the Rainlord. Until then, though, weather is a banana peel you can't help but slip on sometimes. And that's a completely reasonable role for weather in a wargame. In real life, they almost didn't have D-Day because of a weather forecast.
What makes it all come together is an opportunistic AI that will stomp on vulnerabilities the instant it sees them. It will pry open weak defensive points, surge across vital supply lines, fight uncompromising delaying actions around bridges, even take objectives you hold if it sees the chance. In an Armchair General interview, one of the developers reveals a surprising approach to AI: their goal was to get it to react to immediate local developments with fundamental counters based on skilled human play -- it sounds a bit like joseki in Go.

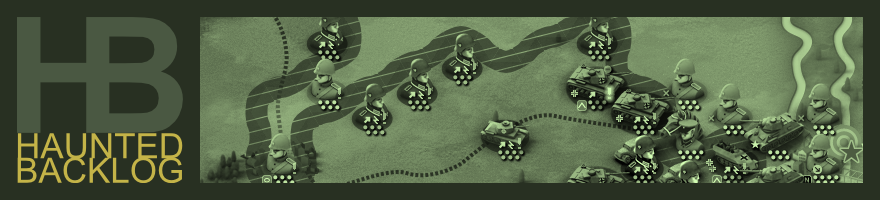
Let me fire up Voronezh and show you the game. Voronezh is the scenario included in the demo. You win if you beat it in six turns, but for a Brilliant Victory, you must beat it in three. Right away you'll notice that there is a railroad (dotted line) from Kursk to Voronezh, and the entrenched (orange spade) Soviet infantry units within two hexes of the railroad have tank support (blue box with white circle). Railroads propagate supply perfectly, so I'd really, really like to advance along it.
But if you look at the southern part of the map, I've got significant forces down there and a southern objective to capture as well. Can I take that bridge in the southern center and strike across the open terrain to Liski? It's a tough call. I think I will feint in the south, destroying and encircling what I can to take the pressure off the main offensive and the Romanian portion of my defensive line (green uniforms and stewardess caps, little green tank). If it happens to open up that bridge, so much the better, but my supply line enhancements (barrel button in the upper left) will focus on the Kursk railroad. Some key units will be drawn off from the south to support the fight in the north. Unfortunately, this means they'll be spending a turn repositioning rather than attacking or deterring. This game makes you weigh the tradeoffs of a thing like that. This game has no fog of war, and while a human opponent would definitely take my movement of forces from the south to the north into account, I'm not sure if it's something the AI can recognize.
Soviet tanks are also a danger. They're tough to dislodge, and they can get into position fast. If I leave those tanks alive, they'll dogpile onto whatever gains I make and slow me down. Fortunately I have a lot of good tank-killer units. Every unit marked with an upside-down white V in a blue box has a StuG III detachment, which gives a bonus against armor. I've also got more experienced soldiers in many cases. Unity of Command has four levels of experience: green (green X, quite weak; you can see the Soviet reserves in the back are mostly raw recruits), normal (no icon), veteran (one iron cross for Axis or star for Soviet), and elite (two stars or iron crosses).
Let's talk about fast units. If I want to get the objectives in time, I need my fastest units making the most of their speed. I've got tanks, mechanized infantry (armored troop carrier), motorized infantry (soldier with truck in background), and light infantry (the baseball cap guys in the south). Even that Romanian tank unit is tolerably fast (looks like a Pz 38(t); I'm guessing Soviet and German tank icons are T-34s and Pz IVs respectively, and I think the German mechanized unit is represented by an SdKfz 251). As of this screenshot, I haven't made any moves, so every unit has an arrow indicating that it can move and a lightning bolt indicating that it can attack. Units can sacrifice their attack for extra movement.
The order in which you complete your turn matters a lot. I like to do the most critical stuff first, so that if something essential doesn't happen I can adjust the rest of my planning. With that in mind, I'll open by softening up those defenders near the railroad with airstrikes (airplane button in upper left). I've got four airstrikes, so I can be generous. Then I'll slam them with infantry attacks, seeking to open a hole for my fast units to exploit. Every pressure of the game is toward exploitation. It's exceptionally blitzkrieg-friendly design.
My first attack suppresses a point of enemy strength. I'll tell you about strength and suppression. The colored dots under unit icons indicate their relative quantity. Strengths range from 1 to 7, with 5 and 6 being typical combat strengths. If a dot is greyed out, it doesn't count this turn, but will recover next turn if the unit is in supply. Support subunits like the StuG 3 can also be suppressed or killed, which removes the bonuses of having them. See the greyed-out N support unit on the overstrength infantry in Voronezh? That's an NKVD detachment. You can see another one, not suppressed, on the front line near my Hungarians. The NKVD has the special effect "discourage retreat," which means it will be harder than usual to pry those defenders out of Voronezh when the time comes. All those suppressed units in the Soviet backfield will be fully effective by the time they hit the front lines (or the front lines come to them). A unit's current strength dots are multiplied by its attack value to determine how powerfully it attacks, and by its defense value to determine how powerfully it defends.
My second air attack suppresses three more points of the unit defending the railroad. I think it's time to throw infantry at it. My first ground attack destroys their tank support, but at heavy cost to the attacking unit (4 strength). This is fine, since that unit was expendable. Further ground attack kills their last two active points of strength, breaches their entrenchment, and causes them to retreat. They gain the condition "weak," indicated by a red minus sign in a grey circle. Weak units are relatively easy to destroy. Units with no active strength are the weakest.
But the road isn't open yet. In line with common wargame convention, units in Unity of Command exert a "zone of control" (unless they're weak), preventing one side from moving freely while in close contact with another. To move down this railroad, I need to open up a three-hex path if possible. Shuffling infantry forward, leapfrogging to keep defensive positions filled, I attack the weak unit and destroy it. It's "overrun," which means my infantry can attack again. I hit an adjacent enemy defender, softening it with air power as well. They lose their tanks and are down to two active strength. Further attack results in a breach and retreat.
Now here I'm going to get cute. I can move up some of my tanks from the rear into a spot adjacent to both this next unit of completely suppressed infantry and a Soviet tank formation. If I attack the infantry first, I'll probably overrun it and get to attack the tanks as well. This works as planned.
Air attack on a third unit near the railroad does nothing. Sometimes this happens. Sacrificing a bit of mobility, I divert some tanks to hit them. They're slammed hard, losing four points of strength and retreating. Now I've got that three-hex clear zone and my movement options are opening up. I'm less worried about the infantry line at this point than I am about roadblocks on the railroad -- intervening tanks, cavalry and veteran infantry coming in, and infantry veterans with anti-tank guns already sitting between me and Voronezh.
I commit my elite mechanized unit, hoping to knock out as many Soviet tanks as possible. Combat results are disappointing: two points of tanks knocked out, no overrun. But I've moved a fast unit a good distance forward, so that counts for something. Further tank involvement destroys one of the Soviet tank units with an overrun, which I convert into extra movement to push my lines across more of the railroad.
I've mostly done what I can in the north, but I have some important decisions to make. What am I going to do with those Hungarian tanks? They'd be okay for defense but better for attack, but it doesn't look like they have good attack options this turn. Should I defend the near railroad more thickly, or push my defenders up to stop the Soviets from cutting off my lead tank elements next turn (which they will if they can)? And should my last free motorized unit hit their tanks, which are mobile, or their AT infantry, which pose a special threat to my own armor?
The Hungarian tanks go on defense for now, but will hopefully be useful for mop-ups in the next two turns. The defense moves forward to protect my spearhead. I hit the tanks instead of the infantry, for a reason I didn't mention above: that attack fits better with an effort to coordinate in the south and shut down enemy supply across the Oskol river, which will seriously inconvenience almost half of their army, effectively giving me control of the Donets.
In the south, infantry attacks make a mess of a Soviet tank unit and bloody some infantry. My tanks charge in and secure the near side of the Oskol bridge, smashing the enemy's tank presence as they go. A motorized unit from the southern area shifts north. Most of the Hungarians on the Belgorod-Kursk railway line are relieved and shifted north to provide a second line of defense near Kursk (I'm worried about the Soviet veteran armor unit north of my main push).

Turn 2! As you can see, not only has the enemy pulled together in front of my lines of advance, they've also punched a hole on the Belgorod line, right where the last Hungarians were. This isn't as bad as it looks, since I've got rail supplies coming in from both the north and the south, but I'll need to counterattack and retake the rail line so things don't get out of hand. They also roughed up my lead tanks with some airstrikes, and as I predicted, cut them off. The red exclamation points are initial out-of-supply warnings.
Those AT veterans right on the rail line are too tough. I've got to pry them out of there. Three air strikes later, they're soft enough to dislodge with repeated infantry attacks. I bring up the Hungarian armor to finish them off, get an overrun, and smack their buddy for another two points. My best units hit their second defensive line, destroying two units and almost obliterating a third. They still have some dangerous stuff up there, though, including a veteran tank unit. On the bright side, it looks like I'm forward enough that I'll be able to hit Voronezh reasonably hard on Turn 3.
In the south, I'm mostly just taking the pressure off the main advance. I'm skeptical about my position to take Liski on Turn 3; I don't think I'm close enough. Just in case, though, I've advanced some tanks north around the Oskol and raced up my rearmost motorized infantry (which I wouldn't have done if they'd been needed to clear up that Belgorod counterattack, but my regular infantry managed it). They might be in time to make a difference, but in my experience, you need to use the bridge if you want to get through in the south. With no air support left, my attack odds across the bridge were not great.

Turn 3! Would you look at that, they took Kursk! Two infantry divisions against seven, and a further counterattack in the south breaking the Belgorod-Kursk rail link again. I should not have left a 2-strength unit on the defensive line there, even if it was in the elbow (only in contact with one enemy hex). Those glowing exclamation points mean two turns out of supply; units two turns out of supply cannot attack.
But this isn't as bad as it looks. If I can shrug off my supply issues and take my objectives this turn, I win a Brilliant Victory. If I can't, though, and I neglect to restore my supply lines, I could be comprehensively fucked. With the Soviet defensive line on the Oskol abandoned, though, that's a coin I'm willing to flip. I'll commit to the offensive wherever I can, countering the rail interdictions with rear units only.
My first order of business is in the south. A quick rush forward overruns most of the Soviets in the way, leaving an armored unit in the objective hex and a negligible green infantry unit nearby. Unfortunately, I suspect that while I can clear the hex this turn, I can't occupy it. Maybe splitting the Voronezh knot will open up some new possibilities for me, or maybe with enough air support I can weaken the defenders enough to get some lucky overruns and bonus moves.
I go for the air support thing, but infuriatingly, moving into contact with the enemy zone of control means that although a double overrun leaves my tanks with an attack, the lightning bolt is greyed out, indicating that I can't convert it to movement. I am one hex away from the empty objective. On the other hand, I could divert my mechanized unit from the north push and take it -- but probably not make it into Voronezh this turn as a consequence, especially since I used up all my air support and they have veteran tanks in the way and NKVD-supported infantry in the city. Side note: the tank unit that attacked Liski levels up, becoming veteran.
It takes four costly infantry attacks to push the Soviets out of Kursk, and a fifth unit to reoccupy the city. All this comes from my now less-necessary rear line in the north. The south is also mopped up. Hopefully, I go ahead and sprint my mechanized infantry into Liski. I figure I'll either make it on time, or be a turn late. I'm regretting not trying to crack the Oskol bridge last turn, even though they completely fell back from that position this turn -- that's how time-sensitive this game is!
Trying to punch through the defenses before Voronezh in the north, I put the best overrun chances first. My panzers clear out green units, but it looks like I'll have to resign myself to taking Voronezh at least one turn late, as I suspected. Embarrassingly, I can get more use this turn out of bumping my open-country supply node near Olkhovatka than from my rail supply. This is the result of racing past my supply lines to get Liski. Some of my units are going to spend a second turn out of supply at the end of this turn, making them useless for the finale.
On the plus side, my motorized units finally destroy that tank unit in the north, and it looks like I'm in a good position overall for Turn 4, with good supply lines everywhere but Liski and lots of hard-hitting units in striking distance of Voronezh.

Turn 4! I spend all four of my air attacks on Voronezh. The results are dismal: City in Ruins on the very first one, and only one lousy point of suppression total. Voronezh will be painted with blood by the time I take it. I probably unwisely roll up my unsupplied forces from Liski to almost but not quite cut off enemy supply to Voronezh, which will almost but not quite be useful. Cutting their supplies would prevent their suppression from refreshing into active strength between turns. However, my Liski spearhead is now going to go into third-turn lack of supply while adjacent to enemy forces, meaning my mechanized unit could easily be wiped out. Oh well, scenario's ending anyhow.
But not this turn, because Voronezh proves to be just as tough to bust into as I expected. They're down to one point, the NKVD, and two suppressed points, but that's as close as I could get.

Turn 5. When an exclamation point is black with a red glow, it means a unit is three or more turns out of supply, completely suppressed, unable to attack, and likely to be destroyed if attacked by anything at all. I'll withdraw them if it looks like this will go to turn 6, but I think I can take Voronezh. Four air attacks leave two points of the defending unit suppressed. My first tank attack kills three points and breaches their fortifications. With all the defenders suppressed, I give the Hungarian tank unit the honor of storming the city. Final score: 420/500. Shameful, sloppy... I think I'm out of practice at this game. I absolutely should have tried to cross the Oskol bridge on Turn 2. Or maybe it was a mistake to move that mechanized unit from the south to the north when I could have had it start fighting right away. Or maybe the key delays were caused by the supply problems I had when I didn't secure my railroads well enough. Or maybe, like a real general, I should blame bad air support. Thanks a lot, Göring.
There's a demo on Steam, but you can also find it here, including Mac and Linux versions. The tutorials are the best I've ever seen in a wargame. Can you master Voronezh?
I have not yet won a Brilliant Victory at Stalingrad.


